
Course Bundles: Manage Collaborative Transfer Bundles
Course Bundles are grouped collections of courses, standardized exams, military credits, and program requirements within Transferology® Lab. These can be used by college staff to advise students more efficiently and to research transfer scenarios. Pre-named bundles can be automatically created from advising & recruiting leads. This article provides an overview of how to manage existing Collaborative Transfer Bundles.
In this article:
To manage Collaborative Transfer Bundles:
- Go to the Advising & Recruiting menu.
- Select Course Bundles.
- By default, the Transfer tab will be selected.
- Select the Collaborative tab.
By default, any previously saved bundles within the Transfer Bundles section will display in a hyperlinked table format.
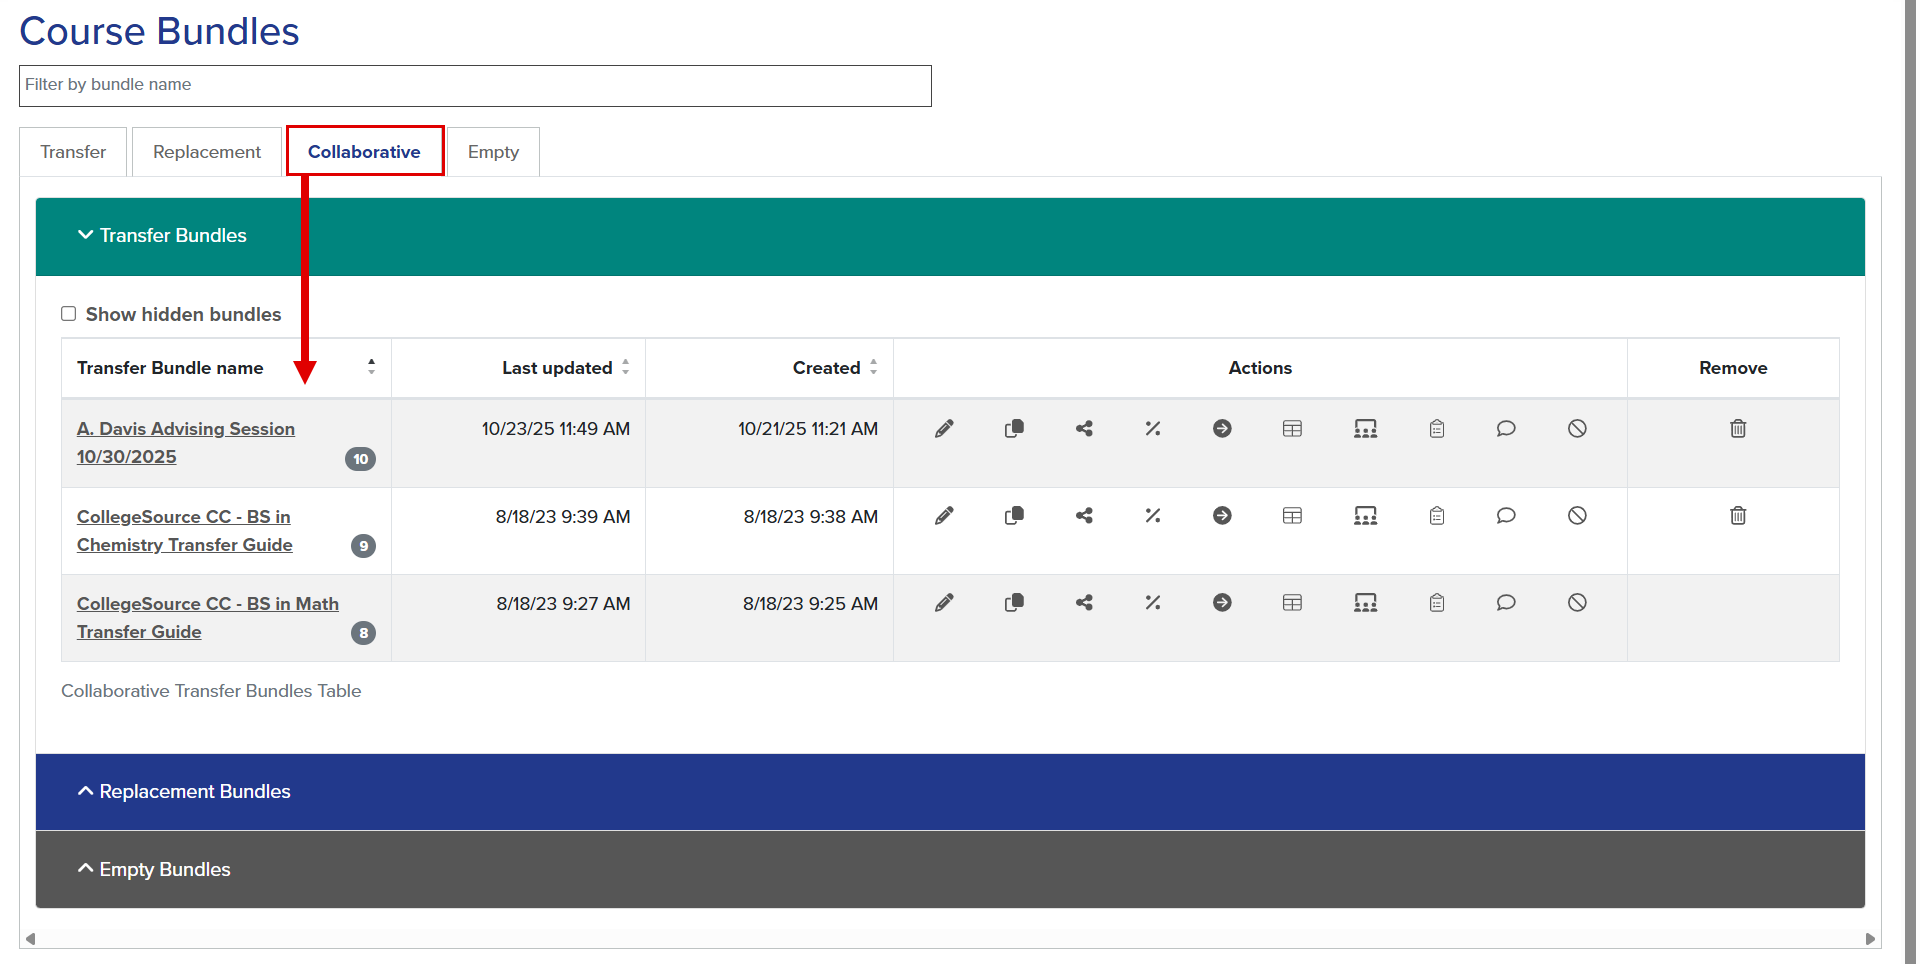
- Use the grid actions to manage the Collaborative Transfer Bundles:
| Column | Example | Description/Actions Available |
|
Transfer Bundle name |
A. Davis Advising Session 10/30/2025 |
Name of the Course Bundle. Select the hyperlinked name or the number of courses (20) to view/edit the bundle. |
| Last updated | 10/23/25 11:49 AM |
Date and time of the bundle's last update. MM/DD/YY HH:MM ET |
| Created | 10/23/25 11:49 AM |
Date and time of the bundle's creation. MM/DD/YY HH:MM ET |
| Actions |
|
View the existing course bundle and course list:
Displays to users granted the View permission only. View/edit the existing bundle and course list:
Displays to users granted the View and Edit permissions. Create a copy of the course bundle (include all coursework):
Share the bundle with another Transferology® Lab user:
View matches within the Schools Found page:
Run a Program audit (if available) or view Program information:
Export the bundle to a CSV or JSON file:
Manage bundle collaborators Allow other Lab users at the institution to view, edit, delete, co-own a bundle, and invite others to work jointly on a bundle.
Show bundle activity See actions users of the collaborative bundle have taken.
View/edit comments within the bundle:
Hide the bundle from the list:
Show or unhide the bundle:
|
| Remove |
|
Remove (delete) the bundle. Button is visible only to bundle owners and users granted the Delete permission. |
|
|
|
|


View Bundles
Users who have been granted view-only access to a Collaborative Transfer Bundle will see the view icon (eye) in the list of actions to the right of the bundle name. Once selected, the user can see:
- The name of the bundle.
- The courses, exams, and military credits entered, separated by institution or organization name.

From there, the user can:
- Select Return to Bundles to return to the main Course Bundles page.
- Select Search for Matches to view how the courses, exams, and military credits have been evaluated for transfer. See Related Articles for further information.
View/Edit Bundles
Users who have been granted the appropriate permissions can view and edit the Collaborative Transfer Bundle.
To view or modify a bundle, select the view/edit button to the right of the bundle name. The Edit Bundle screen will appear.
Update Bundle Names
To update a Collaborative Transfer Bundle name, a user must be the bundle owner or co-owner.
- Navigate to the box under Bundle Name.
- Select Update bundle name.

- The Update Bundle Name pop-up will appear.
- Use the keyboard to adjust the title.
- The Notify collaborators checkbox will be marked by default. Unless this checkmark is removed, all bundle collaborators will receive an email notification that the bundle name has changed.

- Select Update.
Remove Courses
To remove a Course from the Course List, select the delete button (trash-can icon) to its right.
- To delete all courses from the institution from the list, select the Delete All button to the right of the institution's name.
Add Courses
To add additional courses, standardized exams, or military credits, see Course Bundles: Create Transfer Bundles under Related Articles.
Copy Course Bundles
To create a copy of a Collaborative Transfer Bundle:
- To the right of the bundle name, select the create copy button.
- Select the Transfer tab.
- The bundle will appear within the hyperlinked list under the name Copy of (Bundle Name).
- The email address of the creator of the bundle will display when the present icon is selected.
The copy of the bundle is now a personal bundle that the user is the owner of.
Share Course Bundles
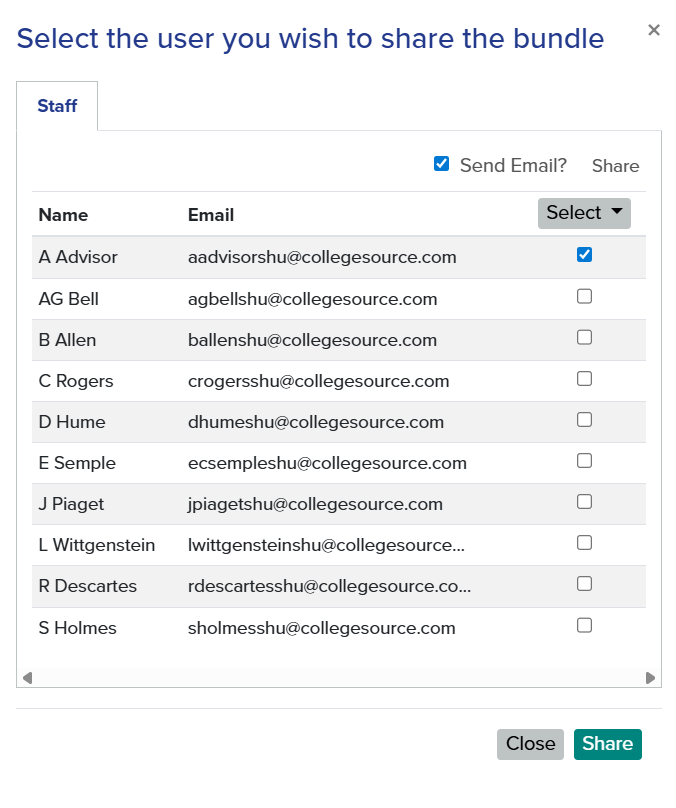
To share a Collaborative Transfer Bundle with another Transferology® Lab user:
- To the right of the bundle name, select the share bundle with someone button.
- Select the user to share the bundle with from the list of Transferology Lab users.
- Mark the checkbox to the right of the user's email.
- To share with all Lab users, choose the Select button and select All.
- If an error is made, select None to clear the selections and start again.
- The Send Email? checkbox is enabled by default. Unselect this checkbox if an email should not go to the person with whom the bundle is being shared.
- The recommendation is to send an email notifying the individual.
- Select Share.
The individual with whom the bundle was shared can locate the bundle on the Transfer tab under the name Copy of (Bundle Name).
View Matches
Select the view matches button to the right of the Collaborative Transfer Bundle name to see how courses will transfer to institutions. For additional steps, see Course Bundles: View Transfer Bundle Matches under Related Articles (go to "The Schools Found page will appear.")
Run Programs
Select the run program button to the right of the Collaborative Transfer Bundle name to see how courses will apply to a Program. Once selected, the Programs page will appear. See Programs under Related Articles for additional steps.
Export Bundles
Select the export bundle to the right of the Collaborative Transfer Bundle name to export the bundle to a CSV or JSON file. For additional steps, see Course Bundles: Export Transfer Bundles under Related Articles.
Manage Bundle Collaborators
Individuals can give other Transferology® Lab users at the same institution permission to view, edit, delete, co-own, or invite others to collaborate on a bundle.
In order to add or remove collaborators, the user must either be the bundle owner or have been granted the permission of Invite.
- The owner of a collaborative bundle can assign and revoke permissions to and from any Lab user at the institution.
- A user with the permission of Invite can only grant others the same permissions that the user has.
- This individual can also remove the same permissions from other users who are not bundle owners, with one exception - when removing Invite, Edit, or Delete, View cannot also be removed.
To grant, remove, or adjust access to a Collaborative Transfer Bundle:
- To the right of the bundle name, select manage bundle collaborators.
- A list of all Transferology® Lab users at the institution will appear. User permissions will be noted by a checkmark in the corresponding field.
If a user has not been granted the Invite permission, the title of the pop-up will read View Collaborators. All of the View, Invite, Edit, Delete, and Owner checkboxes will be grayed out, and the individual will not be able to make any selections. Additionally, the Collaborate button will be grayed out and cannot be selected.

If the user has been granted permission to invite collaborators, the title of the pop-up will read Select the user(s) to collaborate with. The checkboxes corresponding to the permissions that the user does not have will be grayed out and unable to be selected. Permissions are specific to the selected bundle and do not apply to all Collaborative Transfer Bundles.
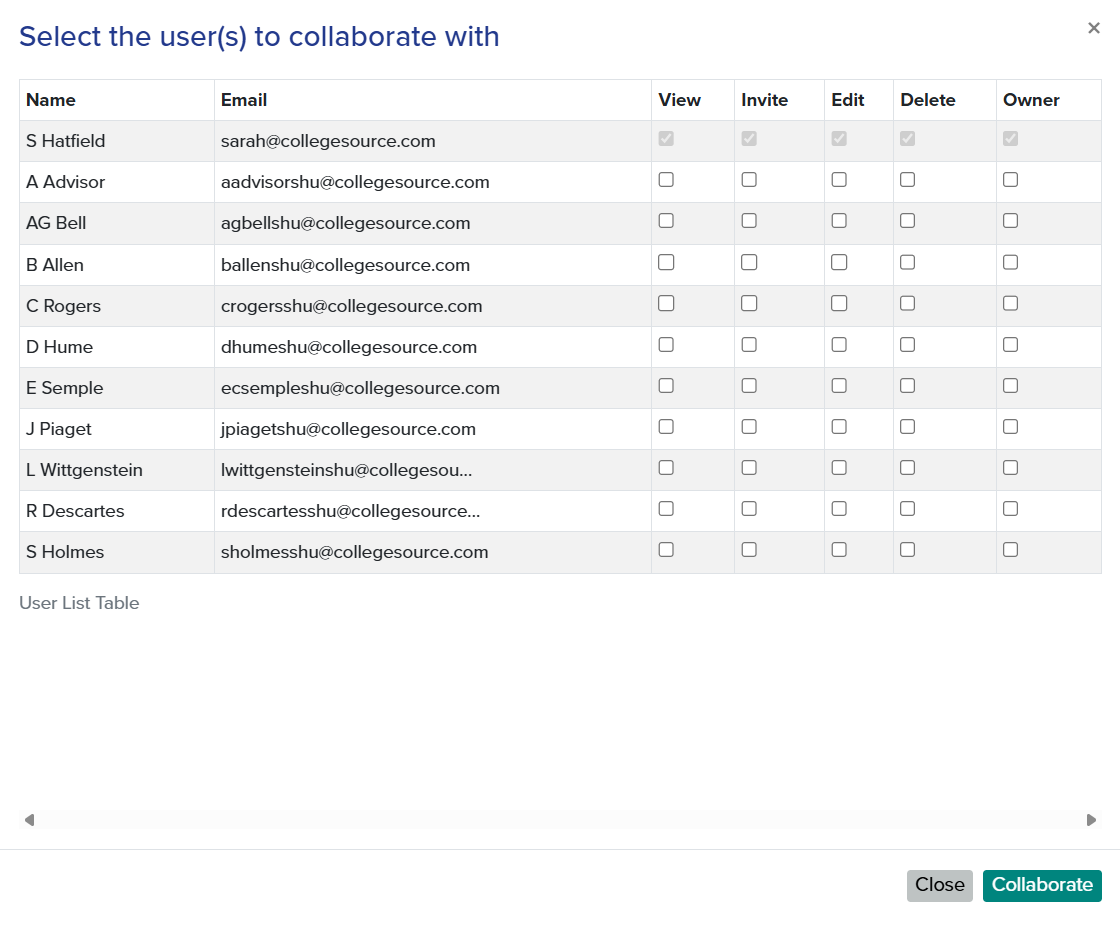
Add Collaborators
To add a collaborator to the bundle:
- To the right of the user's name, mark the box next to the action(s) to which to grant the user(s).
- See the permission descriptions below.
- Select Collaborate.
The collaborator and the person who performed the action will receive an email notification indicating the name of the bundle to which the individual has been added as a collaborator, along with the permissions granted.
Remove Collaborators
To remove a user as a collaborator on the bundle:
- To the right of the user's name, unmark the box next to all the actions the user has been granted.
- Select Collaborate.
The user will receive an email notification indicating that the individual will no longer have access to or be able to collaborate on the bundle.
Modify Permissions
To update a user's permissions for the bundle:
- To the right of the user's name:
- Mark the checkbox(es) of the permissions to be assigned.
- Unmark the box(es) corresponding to the permissions to be removed.
See the permission descriptions below.
- Select Collaborate.
The user will receive an email indicating that the collaboration permissions for the bundle have been updated. The permissions granted will be noted.
| Field | Description |
| View |
Allows the user to:
Selection of any of the options below automatically marks this checkbox. |
| Invite |
Allows the user to:
Selection of this option automatically grants the View permission. |
| Edit |
Allows the user to:
Selection of this option automatically grants the View permission. |
| Delete |
Allows the user to:
Selection of this option automatically grants the View permission. |
| Owner |
Allows the user to:
Selecting this option automatically grants the View, Invite, Edit, and Delete permissions, allowing the user to perform all the noted actions on the bundle. |
|
|
|
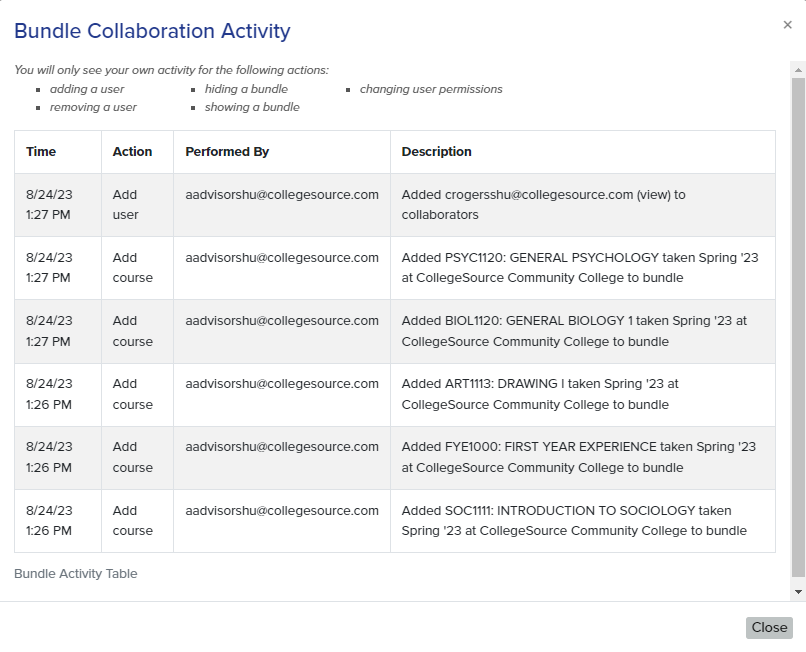
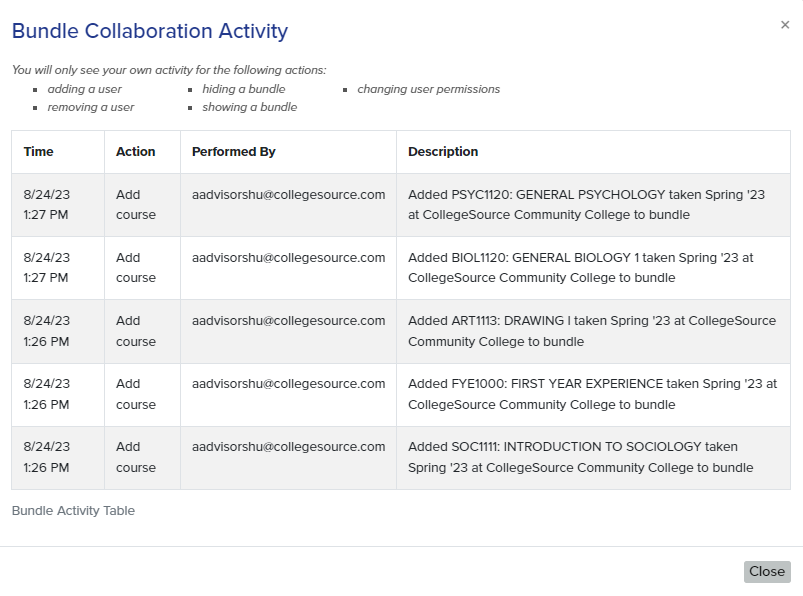
Show Bundle Activity
Bundle collaborators can view the actions taken on the bundle by selecting show bundle activity. What information a collaborator sees within the Bundle Collaboration Activity pop-up will depend upon the user's permissions. A user will only be able to see the user's own activity when it comes to adding a user, removing a user, hiding a bundle, showing a bundle, and changing user permissions.
It is important to note that activity pertaining to the Transfer Bundle prior to it becoming a Collaborative Transfer Bundle will not be reported.
| Action | Permissions |
| Add User |
View - N/A Invite - Only the user's own activity is visible. Edit - N/A Delete - N/A Owner - See the activity of all collaborators. |
| Remove User |
View - N/A Invite - Only the user's own activity is visible. Edit - N/A Delete - N/A Owner - See the activity of all collaborators. |
| Change User Permissions |
View - N/A Invite - Only the user's own activity is visible. Edit - N/A Delete - N/A Owner - See the activity of all collaborators. |
| Add Comments | See the activity of all collaborators. |
| Delete Comments | See the activity of all collaborators. |
| Hide Bundle | Only the user's own activity is visible. |
| Unhide Bundle | Only the user's own activity is visible. |
| Add Course to Bundle | See the activity of all collaborators. |
| Remove Course from Bundle | See the activity of all collaborators. |
| Change Manually Entered Course Title | See the activity of all collaborators. |
| Rename Bundle | See the activity of all collaborators. |
| Delete Bundle | N/A; the bundle and its history will no longer be visible to any user. |
View/Edit Comments
Select view/edit comments to view, add, and manage comments. For additional steps, see Course Bundles: View, Add, and Delete Transfer Bundle Comments under Related Articles.
Hide Bundles
A user may choose to hide a Collaborative Transfer Bundle that the individual no longer wishes to appear in the bundle list. Doing so removes it from the user's list only - not those of collaborators.
To hide a bundle:
- To the right of the bundle name, select hide.
- When asked to verify the bundle should be hidden from the user's list, select Yes.
- The user will receive a notification that the bundle has been hidden, and it will disappear from the page.
To show or unhide the bundle, see the instructions below.
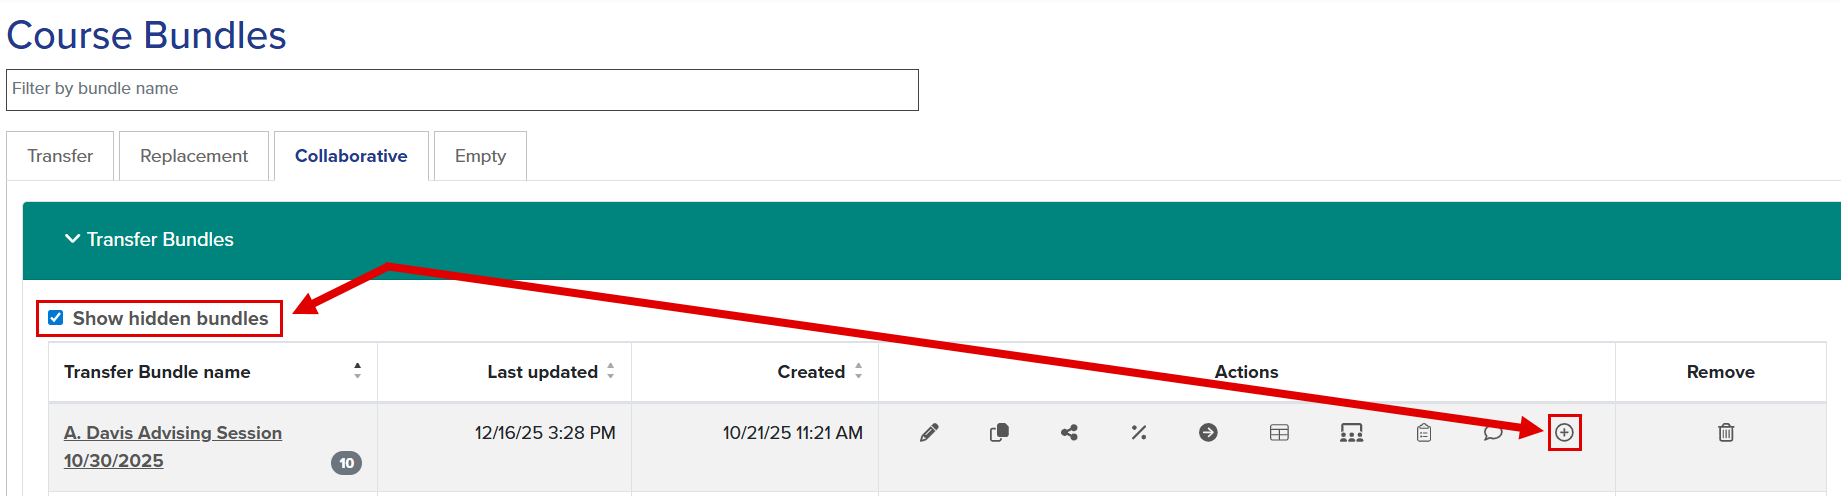
Show Bundles
To show or unhide a Collaborative Transfer Bundle:
- Mark the show hidden bundles checkbox.
- All hidden bundles will be displayed within the Collaborative Transfer Bundle list.
- Select show.
- When asked to verify the bundle should be shown in the user's list, select Yes.
- The user will receive a notification that the bundle is now visible on the page.
Transfer Collaborative Bundle Ownership
If an owner of a Collaborative Transfer Bundle no longer wishes to see the bundle and no longer wants to be an owner, but still wants other users to be able to collaborate on the bundle, the user can:
- First, ensure that there are two additional users who are collaborators on the bundle, one of whom is an owner.
- Ask an owner to remove all of the individual's permissions.
- The user will no longer have access to the Collaborative Transfer Bundle.
Remove/Delete Bundles
Users must have been granted the Delete permission to remove a Collaborative Transfer Bundle.
Before deleting a collaborative course bundle, it is important to note that doing so deletes the bundle for all collaborators. Collaborators will receive an email notification that the bundle is no longer accessible.
If a user no longer wishes to see a Collaborative Transfer Bundle but wants to ensure that others can still use the bundle, the individual can hide the bundle using the instructions above.
If a Collaborative Transfer Bundle owner no longer wishes to see a bundle and no longer wants to be an owner but wants others to still be able to collaborate on and use it, the individual can transfer ownership using the instructions above.
To delete a Collaborative Transfer Bundle:
- Select the trashcan icon to the far right of the bundle name.
- When asked to confirm the bundle and all courses inside should be deleted, select Yes.