
Course Bundles: Create Replacement Bundles
Course Bundles are grouped collections of courses, standardized exams, military credits, and program requirements within Transferology® Lab. These can be used by college staff to advise students more efficiently and to research transfer scenarios. Pre-named bundles can be automatically created from advising & recruiting leads. This article provides an overview of how to create personal Replacement Bundles that can be individually managed and shared with other users.
In this article:
To navigate to Course Bundles:
- Go to the Advising & Recruiting menu.
- Select Course Bundles.
- By default, the Transfer tab will be selected.
- Select the Replacement tab.
Any previously saved bundles will populate the table in hyperlinked text format:
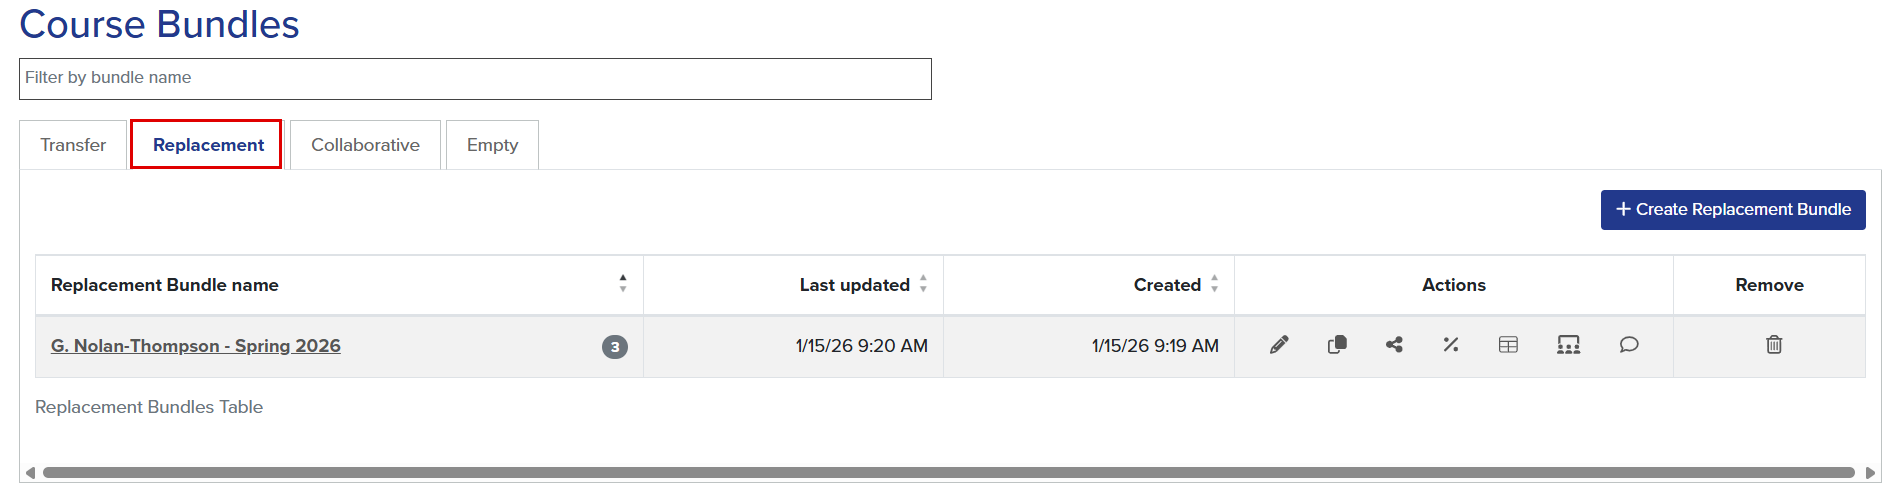
The Replacement tab is analogous to the Find a Replacement Course path in Transferology®. Bundles are collections of courses or Requirement Categories specific to each Lab user's college. The user can Search for Matches to find courses that can be taken at another college and transferred back to fulfill requirements at the current institution.
Bundles on this tab are owned and managed by the Transferology Lab user, but can be:
- Shared with others.
- Converted to Collaborative Bundles if the individual wishes to allow others to view, edit, delete, co-own, or invite others to work jointly the bundle.
Create Replacement Bundles
To create a Replacement Bundle:
1. Select+ Create Replacement Bundle.
The Edit Bundle page will appear.
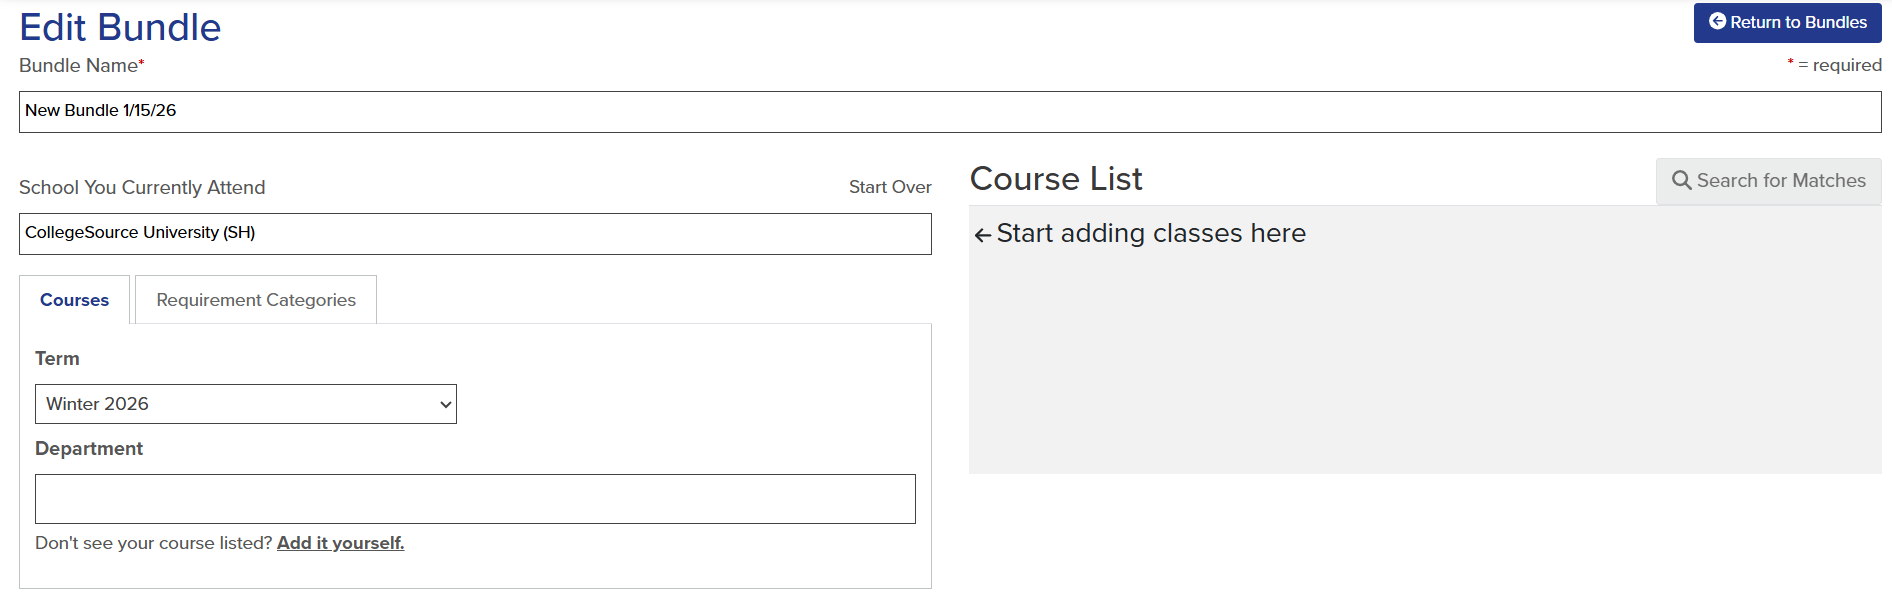
The Lab user's institution will be auto-populated under School You Currently Attend.
- If needing to create a Replacement bundle for another institution, select Start Over.
2. Rename the bundle by navigating to the box under Bundle Name*.
- Use the keyboard to adjust the title.
Add Courses to Bundles
To add a course to a bundle:
- Select the Courses tab (if not already selected by default).
- Under Term, select the Term and Year the course will be taken.
- The default is the current term.
- Under Department, type the name of the Department the course will be taken within.
- As characters are entered, choices will begin to auto-populate.
- Select the Department from the list.
- A list of courses from the institution's catalog will appear.
- Select the + button to the right of the Course to add it to the Course List.

A pop-up notification will confirm that the course has been added:

Delete Courses
If a course was added in error or an incorrect term was selected, delete the individual course from the Course List by selecting the delete button (trash-can icon) to its right.
To delete all courses from the institution from the list, select the Delete All button to the right of the institution's name.
Add Courses to Bundles - Manually
If a course is not appearing in the college's catalog, it can be manually added to the Course List. To do so, follow the steps below.
- Select the Courses tab (if not already selected by default).
- Under Term, select the Term and Year the course will be taken.
- The default is the current term.
- Under the Department box, the text will note "Don't see your course listed? Add it yourself."
- Select Add it yourself.
- Enter the following information in the menu below:
- Course Title (optional) - maximum of 80 characters
- Titling is case-sensitive.
- Department - maximum of 60 characters
- Course Number - maximum of 60 characters
- Hours - by default, 3 is auto-populated
- Course Title (optional) - maximum of 80 characters

- Select +Add to populate the Course List.
Select Choose from course-list to add additional courses from the college's catalog.
In the example below, both PHIL200 and ENGL105 are manually entered courses.
- PHIL200 was entered without an optional title and thus takes on the title Manually entered course.
- Select the hyperlinked text (if desired) to change the title within the Update Title pop-up menu.
A pop-up notification will confirm that the course has been added:

Delete Courses
If a course was added in error, or an incorrect term was selected, delete the individual course from the Course List by selecting the delete button (trash-can icon) to its right.
To delete all courses from the institution from the list, select the Delete All button to the right of the institution's name.
Add Requirement Categories to Bundles
To add a Requirement Category to a bundle:
- Select the Requirement Categories tab.
- Select the + button to the right of the Requirement Category Name to add it to the Course List.

A pop-up notification will confirm that the Requirement Category has been added:

Delete Requirements
If a requirement was added in error, delete the individual requirement from the Course List by selecting the delete button (trash-can icon) to its right.
To delete all courses and requirements from the institution from the list, select the Delete All button to the right of the institution's name.