
Recruit and Advise Students: Student Profile
This article provides an overview of the Student Profile page within the Transferology® Lab. The information below presumes familiarity with Recruit Students and Advise Students. Please review these Related Articles before proceeding.
In this article:
Overview
When exploring transfer options within Transferology®, a student can request information from a school. All student requests are copied or routed to Recruit Students within Transferology® Lab. If the student requests advising or Program information, the request is also copied/routed to Advise Students.
The courses, standardized exams, and military credits the student entered into Transferology are available to the school within the Student Profile page, which is accessible via a Name hyperlink within Recruit Students and Advise Students. Programs run by the student (all or only those run at the school being contacted - depending on student election) are also available within the Student Profile.
To navigate to the Student Profile from within Recruit Students:
- Go to the Advising & Recruiting menu.
- Select Recruit Students.
- The Active Leads tab is selected by default. Select the hyperlinked student Name.
- See Recruit Students (under Related Articles) for instructions regarding filtering and un-archiving leads.
- The Student Profile cannot be accessed via the Archived Leads tab.
- See Recruit Students (under Related Articles) for instructions regarding filtering and un-archiving leads.

To navigate to the Student Profile from within Advise Students:
- Go to the Advising & Recruiting menu.
- Select Advise Students.
- The Needs Advising tab is selected by default. Select the hyperlinked student Name.
- See Advise Students (under Related Articles) for instructions regarding filtering and re-opening requests.
- The Student Profile cannot be accessed via the Done Advising tab.
- See Advise Students (under Related Articles) for instructions regarding filtering and re-opening requests.
Selecting the hyperlinked student Name brings the user to the Student Profile page:
The Student Profile contains two tabs:
- Courses
- Programs
In addition, on the right is the biographical/contact information of the student. Students' first name, last name, and email are required when creating a Transferology® account. Students can optionally provide city, state, zip, country, address, and phone number.
If the student's email is verified, a green checkmark will appear to its right:

If the email is unverified, a question mark will appear to its right:

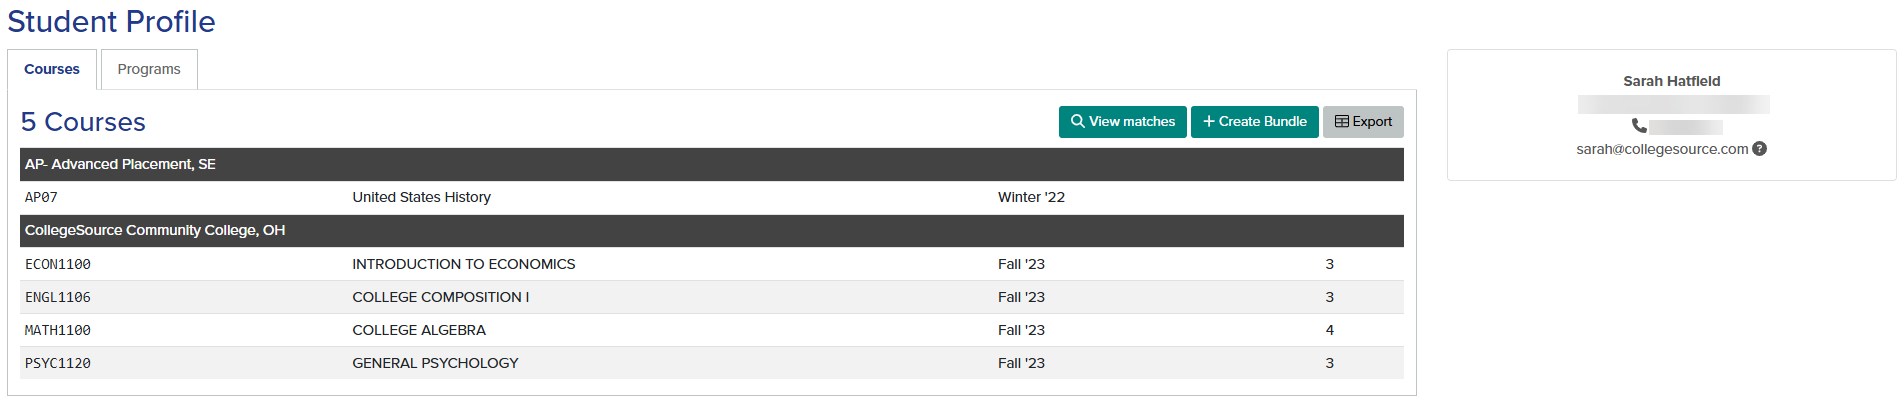
Courses
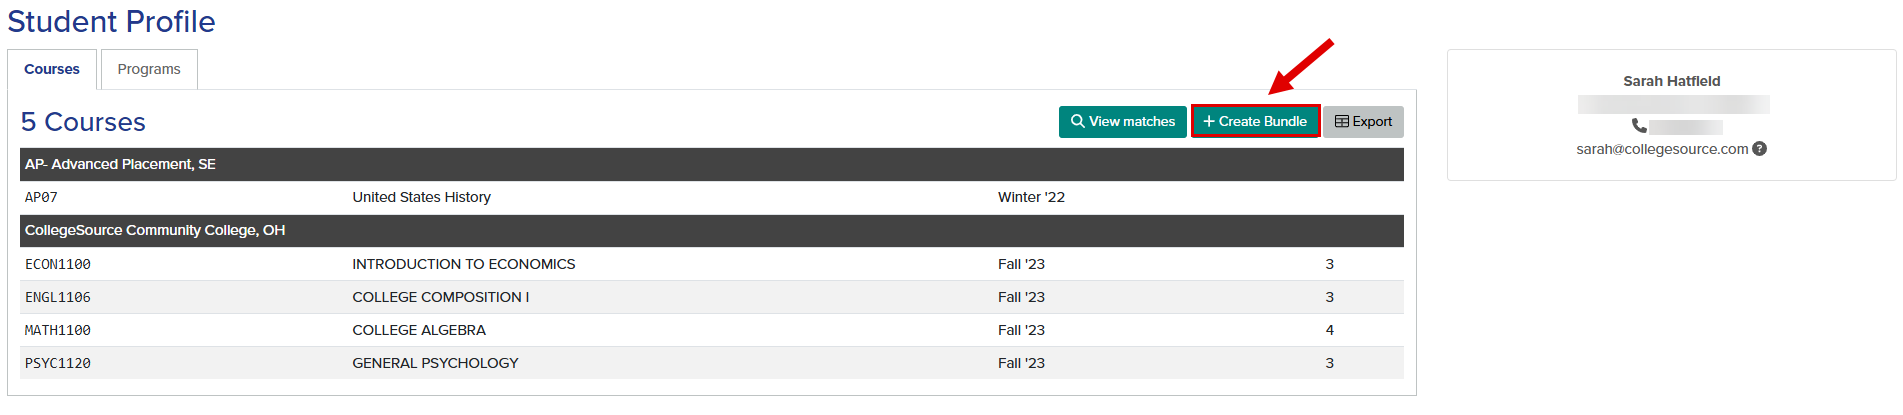
Student courses are listed by institution and then by course number:
In the example above, the student has entered one Advanced Placement standardized exam and four CollegeSource Community College courses into Transferology®.
Within the Courses tab, the following actions are available:
- View matches.
- Create Bundle.
- Export.
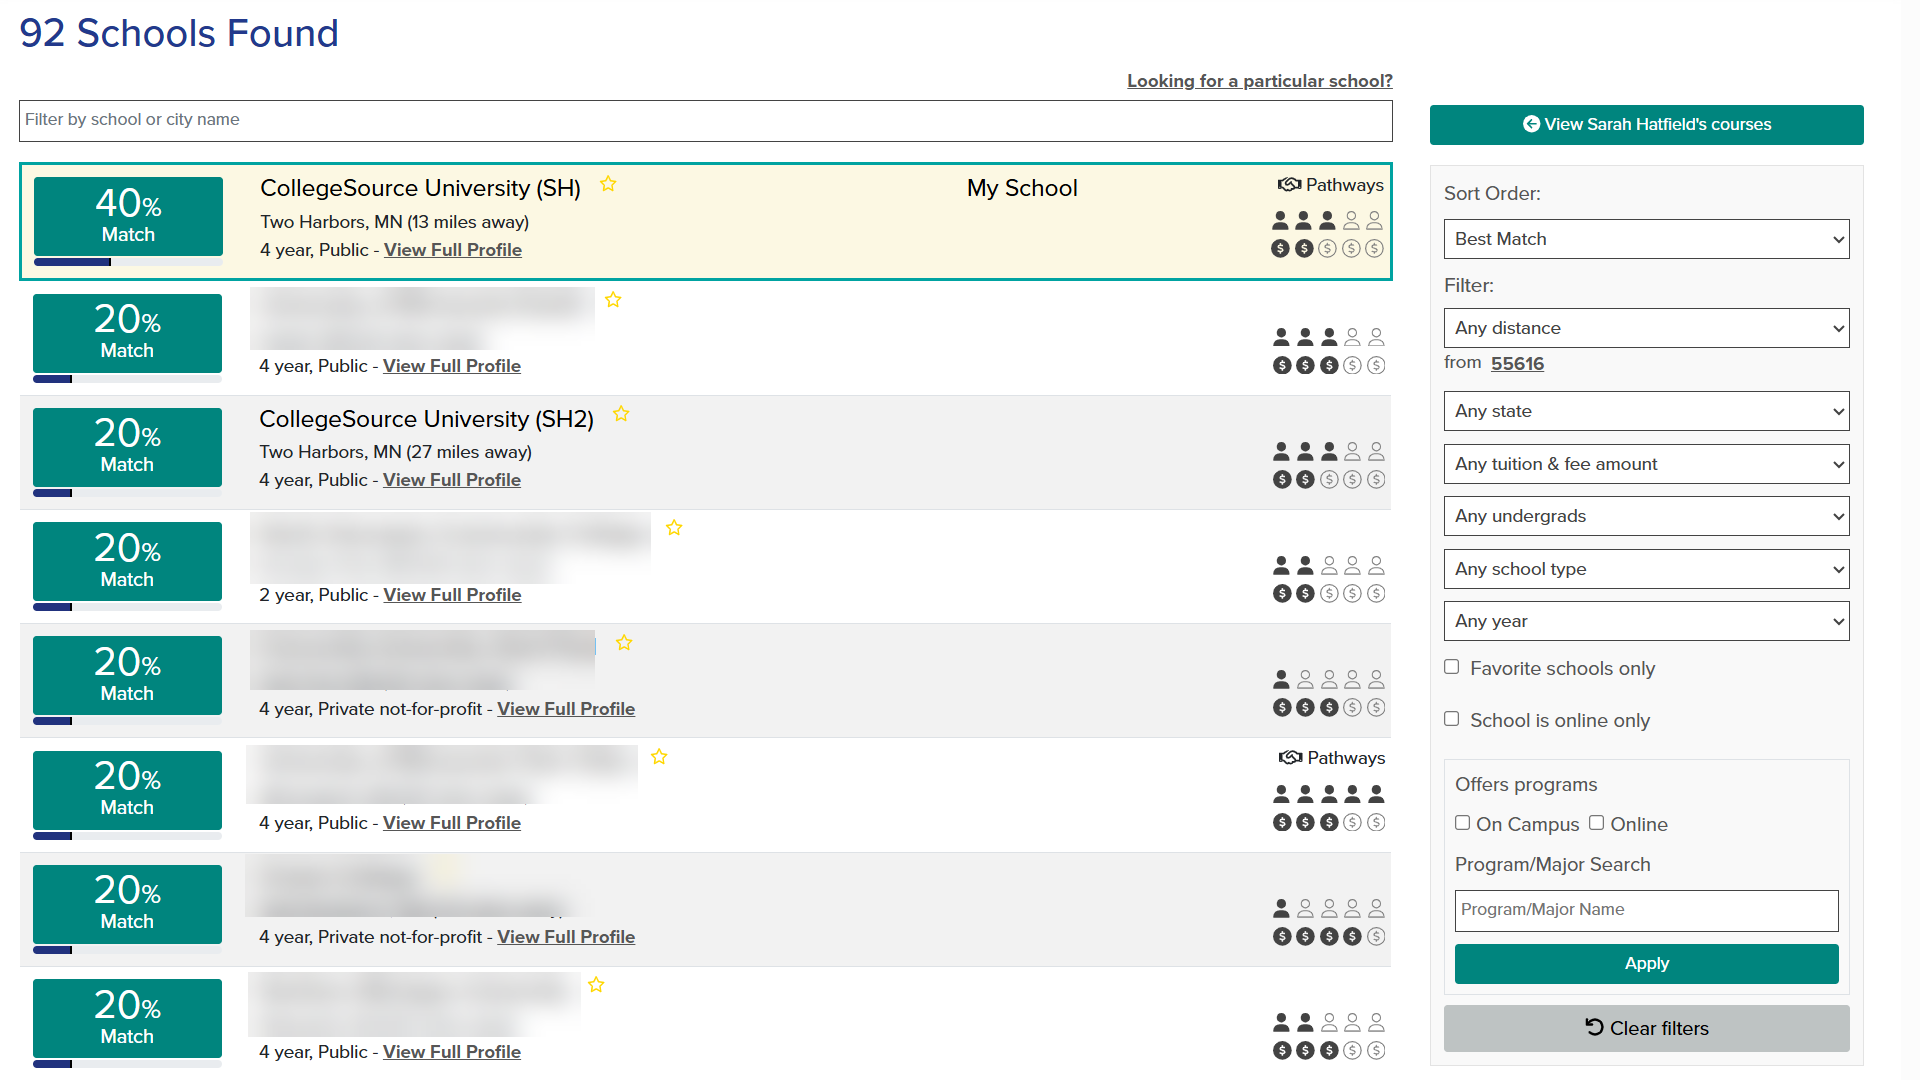
View matches
Select View Matches to see the student's Match results. The Transferology® Lab user's college will appear at the top (My School).
- Scroll through the results, ranked from highest to lowest % Match.
- Use the Sort and Filter options to the right to narrow results to specific needs/preferences.
- See Sort and Filter Transfer Match Results under Related Articles.
- Select the Return to the top button at the end of the Match results to quickly navigate back to the top of the list.
Use the View <student's> courses button to return to the previous screen:

Select the % Match next to the school name to view the Match results:
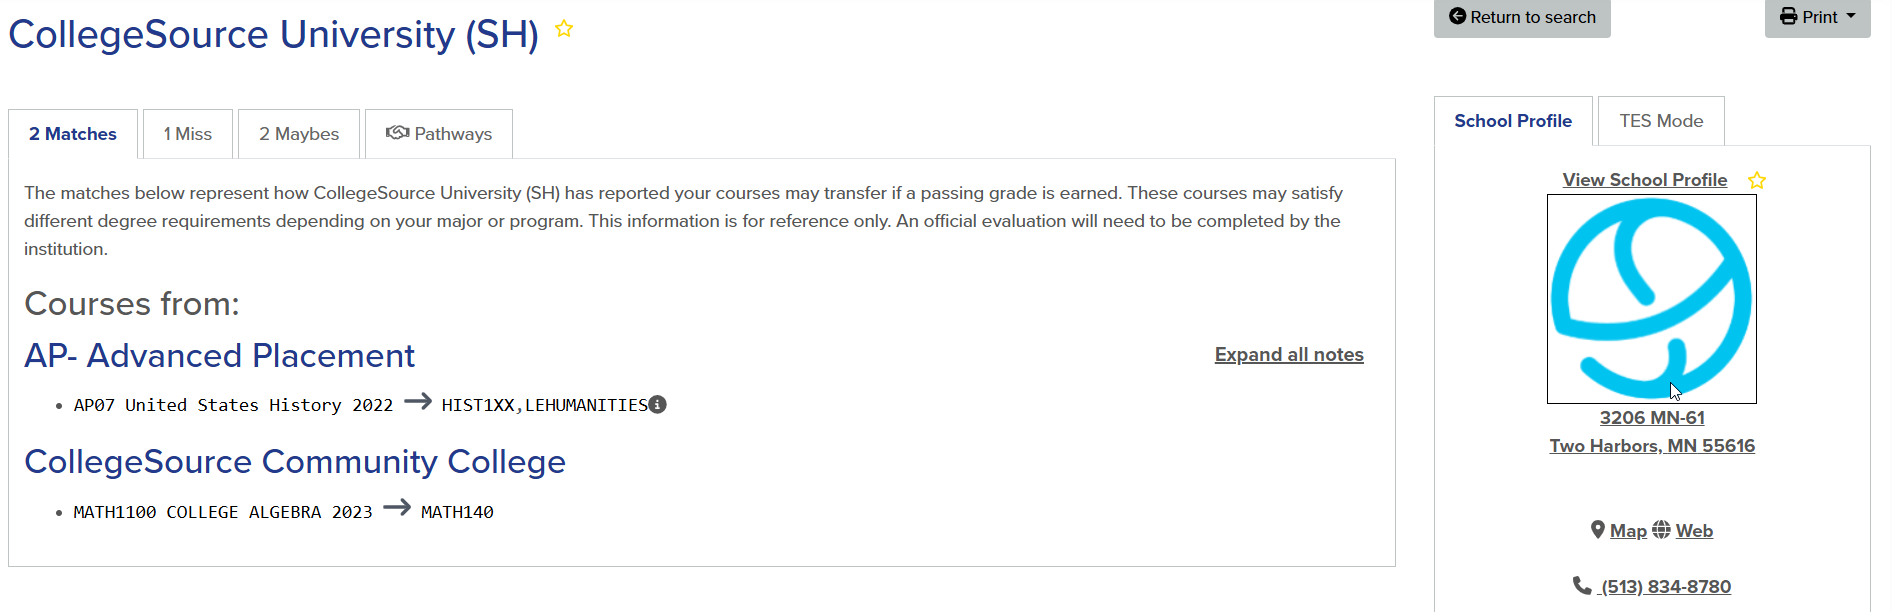
- Matches indicates how courses may transfer (assuming they are completed with passing grades).
- Misses indicates which courses do not transfer, as well as possible matches if additional courses were taken.
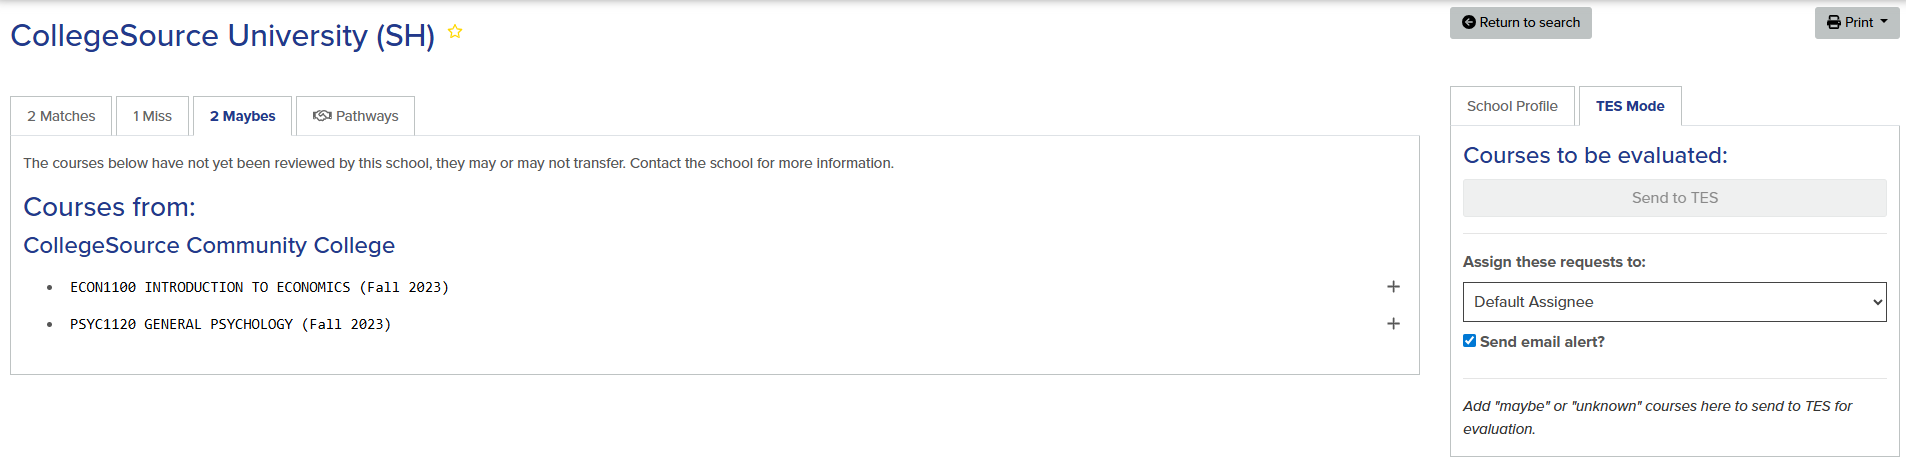
- Maybes indicates which courses have not been reviewed for transfer. They may or may not transfer.
The Pathways tab will appear if the student has entered at least one course from a transfer institution that has established a Pathway in Transferology with the home school. Select this tab to view the Pathways from the partner school.
TES Mode
When students reach out to a school through Request Information, it is often because there is an interest in having courses evaluated for transfer. Institutions with a TES® subscription can use the TES Mode feature within Transferology® Lab to send courses from the Maybes tab for review in TES without leaving the Lab. See TES Mode: Create Evaluation Tasks from the Transferology Lab (under Related Articles) for more information.
View Program Information
Select View Program Information within the School Profile to see how the student's courses will apply to the Program the student expressed interest in. See How to View Program Information under Related Articles for details.

Create Bundle
To create a Course Bundle from the Student Profile, select + Create Bundle. This course grouping will be available within Course Bundles within the Advising & Recruiting menu.
The bundle will be named using the following convention: Student First Name + Last Name + Date Bundle Created (MM/DD/YY).
- Example: Sarah Hatfield 11/29/2023
Export
An Export button is available in the upper-right corner of the Courses tab.
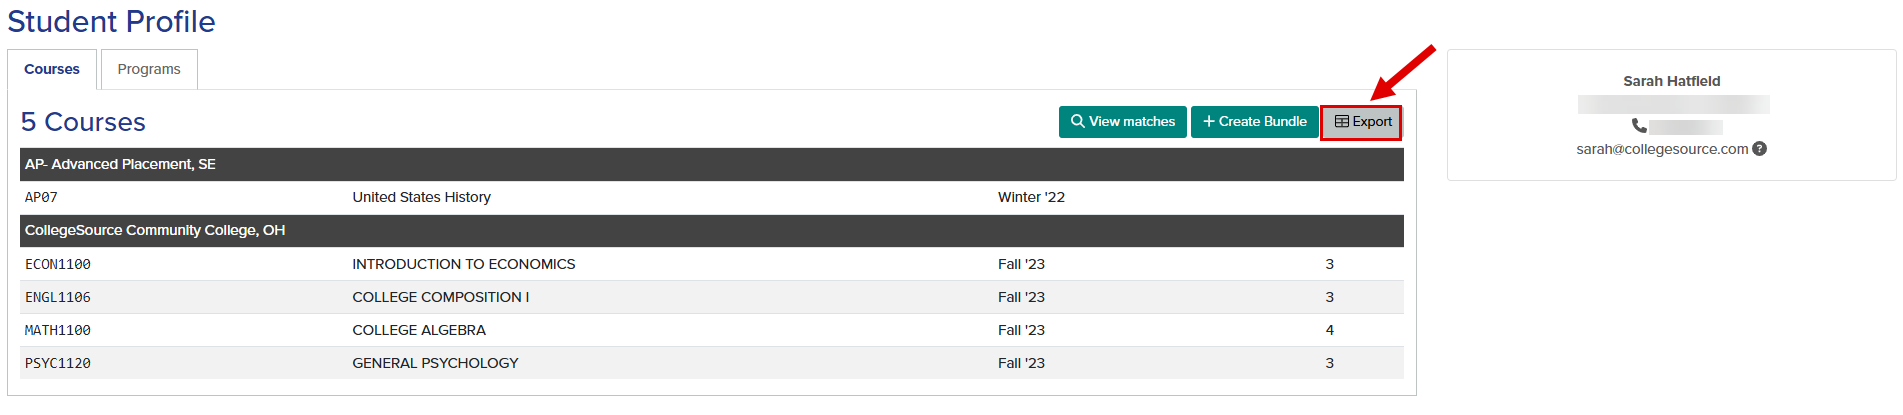
To export information:
- Select the Export button.
- Enter/select the criteria below.

| Field | Instructions | Restrictions |
| File name |
Key in the file name for the courses to be exported. The File name field generates a default file name that may be customized before export. Format of the default file name: (First Name_Email with a space instead of @_CourseList_YYYYMMDDHHMMSS.(extension) |
Required |
| File Type |
Select from: CSV Data configured as a CSV file can be opened in Microsoft® Excel. JSON Data configured within a JSON file can be opened with most text editors. |
Required |
|
|
|
|
- Select Export.
Institutions can work with college or university IT staff to import export files into a Student Information System (SIS) or Customer Relationship Management (CRM) solution.
Schools can contact Transferology Support to set up a direct integration to import student leads and contact information into Slate.
Export Fields
Included in the export are the following fields:
|
Student email linked to the Transferology account. |
|
IPEDS_ID Integrated Postsecondary Education Data System (IPEDS) institution ID number. |
|
SCHOOL College, university, or organization the course is from. |
|
COURSE Transfer institution course identifier (often structured as a subject + number). |
|
TITLE Name of the course (a brief label). |
|
TERM Term the course was entered/selected in Transferology. |
|
HOURS Credit value of the course (educational systems vary; this number could represent semester, quarter, unit, or other credit types). |
|
SOURCE Source of the data (Transferology Lab). |
|
|
Programs
Students and staff can only run audits at institutions that supply degree audits through uAchieve®.
The Programs tab contains a hyperlinked list of the Programs the student has run within Transferology®. If the student did not select the Only share programs for this school. checkbox when requesting information from the college, all Programs will display. If the checkbox was selected, only those from the school contacted would appear.

| Column/Icon | Screenshot | Description |
| Date |
|
Date and time the audit was requested. |
| Program |
|
Name of Program. Select the hyperlinked name to view the audit. |
| School |
|
The school the audit originated from. |
| Viewing Other Courses From |
|
If an institution is listed:
If an institution is not listed:
|
| Status |
|
A green checkmark indicates the audit successfully completed.
A white exclamation mark inside a black triangle or circle indicates the audit did not complete due to an error.
A spinning wheel indicates that the audit is still attempting to process.
|
|
|
|
|


Run Program
From the Student Profile, select Run Program to generate a new audit using the student's courses. The Programs page will appear with a list of Program Names. A list of all audits run will appear within the My Program Requests tab.
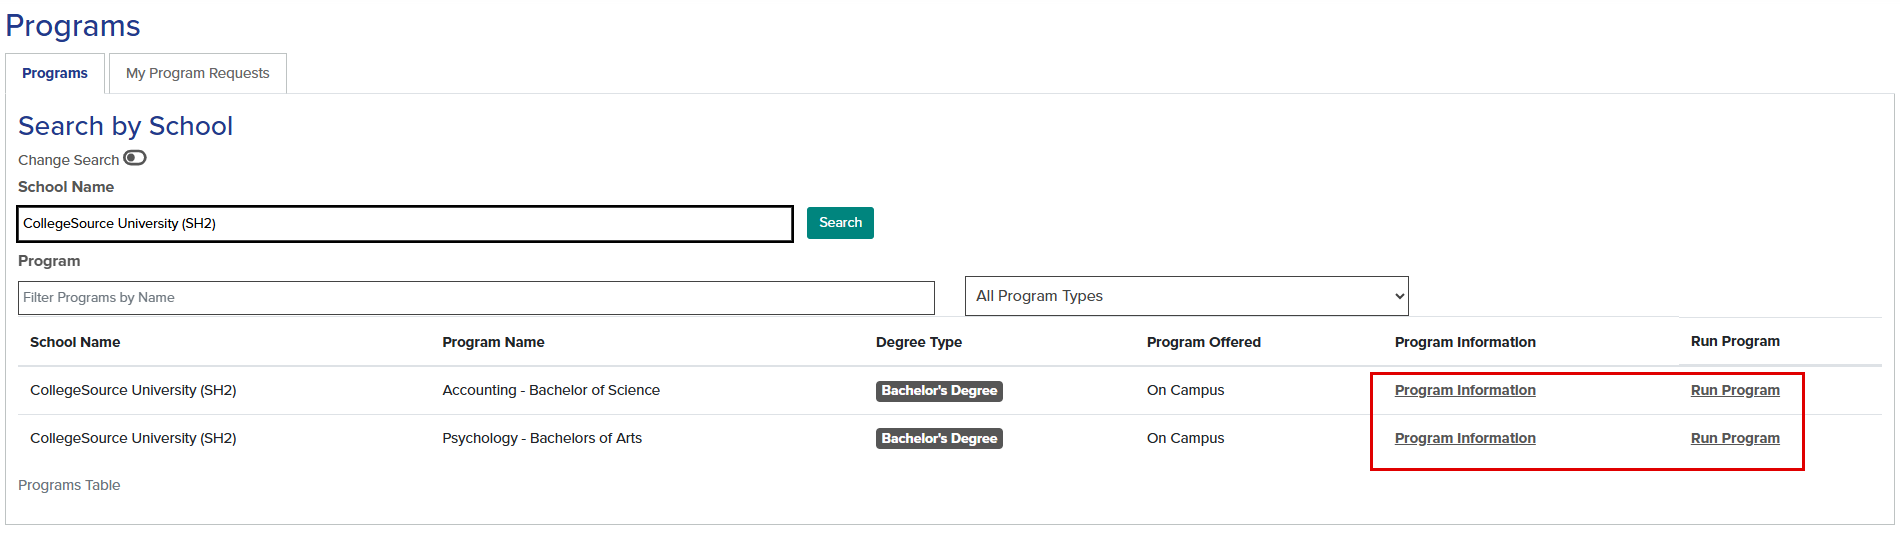
Select Program Information to be taken to the program information page. Here, view Program Information and Transfer Information links, the School Profile, and/or select See how your courses might count toward this program to initiate an audit request. Follow the series of prompts that appear.
Select Run Program to be taken directly to the audit prompts.
Export
An Export button is available in the upper-right corner of the Programs tab.

Selecting Export will configure the student data on the current page into a CSV file. The export contains the fields noted above, along with a column noting that the source of the export is Transferology Lab.