
Advise Students
Advise Students is one of two areas within Transferology® Lab from which schools can manage information supplied by prospective students via Request Information. This article provides an overview of this feature.
In this article:
Overview
When exploring transfer options within Transferology®, a student can request information from a school. All student requests are copied or routed to Recruit Students within Transferology® Lab. If the student requests advising or Program information, the request is also copied/routed to Advise Students.

The Advisor role is required to access Advise Students. Within this area of the Lab, the staff member can track whether the student has been provided with guidance.
To access this page within the Transferology® Lab:
- Go to the Advising & Recruiting menu.
- Select Advise Students.
The majority of this page is table-formatted student information. Advisors may filter this information or export it. Student information is contained within two tabs:
- Needs Advising
- Done Advising

The Advisor may toggle between tabs to track student progress throughout the advisement process.
Needs Advising
The Needs Advising tab (default) provides information listings for students currently needing advisement. Many of the text fields and buttons on the Needs Advising tab are hyperlinks:

| Column Name | Screenshot | Description |
| Name |
|
Select hyperlink to View Profile of the student needing advisement. See Recruit and Advise Students: Student Profile (under Related Articles) for an overview of how to:
|
|
|
Select the Email address link to send the student a message. Verified email addresses are denoted with a checked envelope symbol. |
|
| Date |
|
Select the MM/DD/YYYY formatted date link to view the original student request for more information. Hover to see date/time stamp; select to view the student's message (if applicable). |
| Program |
|
Lists the name of the Program, if supplied by the student. |
| Advise |
|
Select the Advise button to move the student from the Needs Advising tab to the Done Advising tab. The student may be returned to the list of active advisees by navigating to the Done Advising tab and selecting the Re-open button.
|
|
|
|
|


Filters
Filter Field
The Filter Field is above the student information table, where the Advisor may type in a student name, email address, or program to filter students.

Filter Box
The Filter box allows for filtering by date range field, with additional checkbox parameters for filtering by student need(s).

| Icon | Need |
|
|
Programs Select the checkbox to specify that students with a declared interest in Programs be included in the filter results. |
|
|
Verified email address Select the checkbox to specify that students with a Verified email address be included in the filter results. |
|
|
|


Select Apply to filter the results. Select Clear filters to reset all filter constraints placed on the student data.
Date Range
Select the following options from the drop-down menu:

- None
- Last 30 Days
- Last 60 Days
- Last 90 Days
- Last 180 Days
- Last 365 Days
- Custom
Select Apply to filter the results. Select Clear filters to reset all filter constraints placed on the student data.
The Custom option will prompt a monthly calendar to pop out on the right.
If expected results are not seen in the information table, check the date range filter. Excessive filtering can severely restrict results. The default setting for the date range filter is Last 90 Days.
Done Advising
The Done Advising tab provides a listing of information for all of the students moved from the Needs Advising tab because advising has occurred. Student information is never deleted from the Done Advising tab.

| Column/Icon | Screenshot | Description |
| Name |
|
Name of the student. |
|
|
Email address of the student. Verified email addresses are denoted with a checked envelope symbol. |
|
| Date |
|
MM/DD/YYYY formatted date of the original student request. |
| Program |
|
Lists the name of the Program, if supplied by the student. |
| Re-open |
|
Select the Re-open button to move the student from the Done Advising tab to the Needs Advising tab. Students may be returned to the list of students having been advised by navigating back to the Needs Advising tab and selecting the Advise button.
|
|
|
|
|


Filters
Filter Field
The Filter Field is above the student information table, where the Advisor may type in a student name, email address, or program to filter students.
Filter Box
The Filter box allows for filtering by date range field, with additional checkbox parameters for filtering by student need(s).
| Icon | Need |
|
|
Programs Select the checkbox to specify that students with a declared interest in Programs be included in the filter results. |
|
|
Verified email address Select the checkbox to specify that students with a Verified email address be included in the filter results. |
|
|
|
Select Apply to filter the results. Select Clear filters to reset all filter constraints placed on the student data.
Date Range
Select the following options from the drop-down menu:
- None
- Last 30 Days
- Last 60 Days
- Last 90 Days
- Last 180 Days
- Last 365 Days
- Custom
Select Apply to filter the results. Select Clear filters to reset all filter constraints placed on the student data.
The Custom option will prompt a monthly calendar to pop out on the right.
If expected results are not seen in the information table, check the date range filter. Excessive filtering can severely restrict results. The default setting for the date range filter is Last 90 Days.
Export
An Export button is available in the upper-right part of the screen above the Filter box.

Selecting Export will configure the student data on the current page into a CSV or JSON file that can Recruiters have the option to export filtered results only or all results.
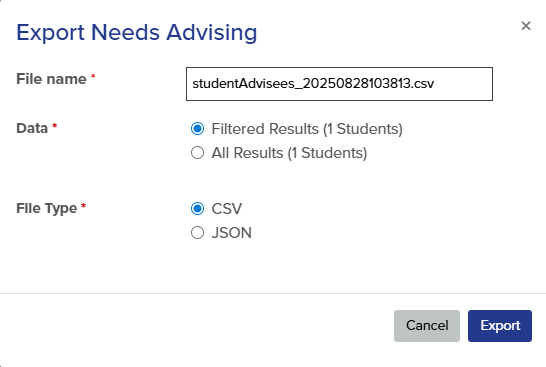
| Field | Instructions | Restrictions |
| File name |
Key in the file name for the leads to be exported. The File name field generates a default file name that may be customized before export. Format of the default file name: studentAdvisees_YYYYMMDDHHMMSS.(extension) |
Required |
| Data |
Filtered Results Export data only for those students displayed within the filtered results on the chosen tab. All Results Export data for all students on the chosen tab. |
Required |
| File Type |
Select from: CSV Data configured as a CSV file can be opened in Microsoft® Excel. JSON Data configured within a JSON file can be opened with most text editors. |
Required |
|
|
|
|
Institutions can work with college or university IT staff to import export files into a Student Information System (SIS) or Customer Relationship Management (CRM) solution.
Schools can contact Transferology Support to set up a direct integration to import student leads and contact information into Slate.
Included in the export are the following fields:
| Field | Description |
| FIRST_NAME | Student first name, as displayed in the Transferology profile. |
| LAST_NAME | Student last name, as displayed in the Transferology profile. |
| Student email linked to the Transferology account. | |
| REQUEST_DATE |
Date and time information request submitted. Format: YYYY-MM-DDTHH:MM:SS.MS-UTC |
| PROGRAM | Program name as entered by the student; otherwise, blank. |
| ADVISE |
Yes - Needs advisement. Completed - Marked as complete. |
| SOURCE | Source of data (Transferology Lab). |
|
|
|