
Edit State/System Landing Pages: Links
States/systems can create a customized, branded Transferology® landing page to help promote colleges and universities to prospective students. When navigating to Transferology through the system's referral link or badge, students will see the customized page (assuming it is published) instead of the CollegeSource-branded homepage.
Before making changes to the landing page, please see Edit State/System Landing Pages: An Overview Guide (Related Articles). State Coordinators will need to determine whether to make changes to the landing page in its published or unpublished state. This article assumes that, if needed, the landing page has already been unpublished and will be republished afterward once changes are complete.
In this article:
Overview

To make changes to the information provided:
- Go to the School Profile menu.
- Select Promote Your School.
- Select the State/System Template tab.
- Users will be presented with a message asking for affirmation that the content of the landing page is not the responsibility of CollegeSource. Images, color, and text added to this page are the responsibility of the institution, state, or system to which the page belongs.
- Mark the checkbox in front of I agree and select Agree to continue.
- Scroll down to the section labeled Links.
- This section will contain two components:
- Images with Links.
- Additional Resources Links.
- This section will contain two components:
Images with Links
This section controls the images that display as block photos and the URLs and text that accompany each. Within the editor, users with the State Coordinator role will see the choices currently or last used within the landing page.

| Field within the State/System Template Editor | Description |
| Designated Image 1 | The first of the three images; is displayed on the left. |
| URL for Image 1 | The URL to appear under the text below the image. |
| Text Below Image 1 | The text to appear below Designated Image 1. |
| Image 1 Alternate Text |
The alternate text (or "alt text") for Designated Image 1. This text helps assistive technology users understand the image's content and for use in search engine optimization. By default, the content within Text Below Image 1 will be used as the Image 1 Alternate Text within each state/system's landing page. If no content is entered in that field, the default alternate text will be Designated Image 1. |
| Designated Image 2 | The second of the three images; is displayed in the middle. |
| URL for Image 2 | The URL to appear under the text below the image. |
| Text Below Image 2 | The text to appear below Designated Image 2. |
| Image 2 Alternate Text |
The alternate text (or "alt text") for Designated Image 2. This text helps assistive technology users understand the image's content and for use in search engine optimization. By default, the content within Text Below Image 2 will be used as the Image 2 Alternate Text within each state/system's landing page. If no content is entered in that field, the default alternate text will be Designated Image 2. |
| Designated Image 3 | The third of the three images; displayed on the right. |
| URL for Image 3 | The URL to appear under the text below the image. |
| Text Below Image 3 | Tje text to appear below Designated Image 3. |
| Image 3 Alternate Text |
The alternate text (or "alt text") for Designated Image 3. This text helps assistive technology users understand the image's content and for use in search engine optimization. By default, the content within Text Below Image 3 will be used as the Image 3 Alternate Text within each state/system's landing page. If no content is entered in that field, the default alternate text will be Designated Image 3. |
|
|
|
URLs are limited to 255 characters. The Text Below Image fields are limited to 55 characters, and the Image Alternate Text fields to 120.
States/systems must supply a .edu address or a URL that contains a college or university's domain. Systems wishing to use URLs outside of these requirements will need to seek approval from CollegeSource.
Choose New Image
To change an image:
- Under the Designated Image, select Choose New Image.

- State Coordinators can either upload an image or pick from preselected images.

Upload Your Own Image
Uploaded images must meet the following requirements:
- The image must be a JPG, JPEG, or PNG file no more than 1MB in size.
- For best results, use an image of 600x600 pixels.
- Select Upload Your Own.

- Select Choose File to upload the image.
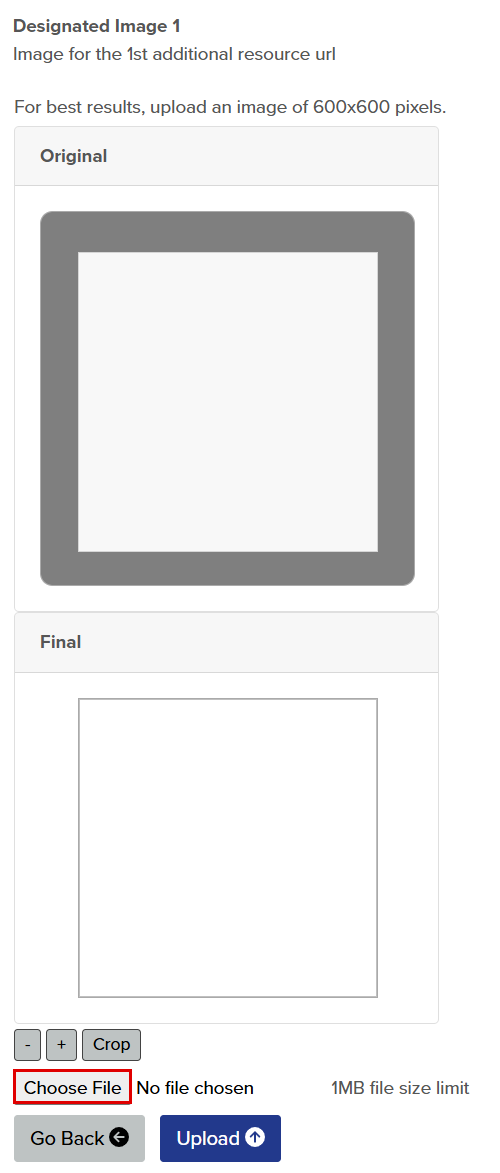
- The image will appear under Original.
- Use the cropping tools to adjust the width or length of the frame.
- Use the mouse to move the positioning of the image within the frame.
- Use the - and + buttons to scale the image within the frame.

- When done, select Crop to preview the image under Final.

- Select Upload.

- Confirm the image appears in the editor as below.

- Select the Preview Changes button at the top of the template to see how selections will appear on the landing page.
To use a different image, select Choose New Image and:
- Repeat the steps above if uploading an image, or
- See the steps below for picking from preselected images.
Alternate Text
Transferology supplies alternate text (or "alt text") for each designated image to help assistive technology users understand the image's content and for use in search engine optimization.
By default, the content within the Text Below Image field of each image will be used as the image's alternate within each state/system's landing page. If no content is entered in the corresponding field, the default alternate text will be Designated Image [Number].
- To override the default text, enter up to 120 characters into the Image [Number] Alternate Text field.
- To change state/system-supplied alternate text, use the keyboard to make adjustments.

- Select Save Changes to save adjustments to the landing page.
- A pop-up will appear noting that the user is about to make changes to the landing page for the system. Doing so will make these changes visible to the public if the landing page has been published. Make sure to review changes via the Preview Changes button.
- Select Yes to proceed with saving changes.
- A confirmation will appear indicating that changes have been saved.
Pick From Our Preselected Images
- Select Pick From Our Preselected Images.

- Scroll through the images in the gallery.

- Choose an image and press Select.
- Under Final, select Upload.
- Users can also choose Select Image to return to the image gallery or Go Back at any point to start over.

- Select the Preview Changes button at the top of the template to see how selections will appear on the landing page.
To choose a different preselected image, select Choose New Image and repeat the steps above.
Alternate Text
Transferology supplies alternate text (or "alt text") for each designated image to help assistive technology users understand the image's content and for use in search engine optimization.
By default, the content within the Text Below Image field of each image will be used as the image's alternate within each state/system's landing page. If no content is entered in the corresponding field, the default alternate text will be Designated Image [Number].
- To override the default text, enter up to 120 characters into the Image [Number] Alternate Text field.
- To change state/system-supplied alternate text, use the keyboard to make adjustments.
- Select Save Changes to save adjustments to the landing page.
- A pop-up will appear noting that the user is about to make changes to the landing page for the system. Doing so will make these changes visible to the public if the landing page has been published. Make sure to review changes via the Preview Changes button.
- Select Yes to proceed with saving changes.
- A confirmation will appear indicating that changes have been saved.
Edit URL for Image
Each of the three Designated Images has an accompanying URL that students can select to navigate to information about the noted topic.

To edit the URL:
- Navigate to the Designated Image for which the URL needs updating.
- Within the URL for Image [Number] field, use the keyboard to remove or adjust the URL.
- Type in a new URL.
- Select the Preview Changes button at the top of the template to see how the URL will appear on the landing page.
- Select Save Changes to save adjustments to the landing page.
- A pop-up will appear noting that the user is about to make changes to the landing page for the system. Doing so will make these changes visible to the public if the landing page has been published. Make sure to review changes via the Preview Changes button.
- Select Yes to proceed with saving changes.
- A confirmation will appear indicating that changes have been saved.
Restrictions
URLs are limited to 255 characters. State Coordinators must supply a .edu address or a URL that contains a college or university's domain. Colleges and universities wishing to use URLs outside of these requirements will need to seek approval from CollegeSource.
Edit Text Below Image
Each of the three Designated Images includes text displayed below the image.
States/systems should be aware when updating these fields that the entered information will also be used as the default Image Alternate Text if the Image Alternate Text fields aren't populated.
To edit the text below the image:
- Navigate to the Designated Image for which the text needs updating.
- Within the Text Below Image [Number] field, use the keyboard to remove or adjust the label.
- Update the text.
- Select the Preview Changes button at the top of the template to see how the text will appear on the landing page.
- Select Save Changes to save adjustments to the landing page.
- A pop-up will appear noting that the user is about to make changes to the landing page for the system. Doing so will make these changes visible to the public if the landing page has been published. Make sure to review changes via the Preview Changes button.
- Select Yes to proceed with saving changes.
- A confirmation will appear indicating that changes have been saved.
Restrictions
The Text Below Image fields are limited to 55 characters.
Additional Resources Links

To edit an additional resource URL:
- Navigate to the Additional Resource URL that needs adjustment.
- To update the URL:
- Within the Additional Resource URL [Number] field, use the keyboard to remove or adjust the URL.
- Update the URL.
- Within the Additional Resource URL [Number] field, use the keyboard to remove or adjust the URL.
- To update the text that overlays the URL:
- Within the Link Display Text field, use the keyboard to remove or adjust the label.
- Update the text.
- Within the Link Display Text field, use the keyboard to remove or adjust the label.
- Select the Preview Changes button at the top of the template to see how changes will appear on the landing page.
- Select Save Changes to save adjustments to the landing page.
- A pop-up will appear noting that the user is about to make changes to the landing page for the system. Doing so will make these changes visible to the public if the landing page has been published. Make sure to review changes via the Preview Changes button.
- Select Yes to proceed with saving changes.
- A confirmation will appear indicating that changes have been saved.
Restrictions
URLs and Link Display Text fields are limited to 255 characters. State Coordinators must supply a .edu address or a URL that contains a college or university's domain. Colleges and universities wishing to use URLs outside of these requirements will need to seek approval from CollegeSource.